This week classes started again at Digital Arts and Entertainment, the school I’m teaching at. In the coming weeks, my colleagues and I will start our lessons explaining the basic principles of linear perspective. The perfect time to write some blog posts about that topic!
Linear perspective is used to translate real-life objects (3d) to a flat 2d medium (e.g. paper). The object appears solid and three-dimensional although it’s drawn on a flat surface. You can use perspective, not only to make objects look solid but also to suggest depth and space in your drawings.
Before you can draw something in perspective though, we need to explore some elements that will help us to do so.
Horizon line or Eye level line
Try to imagine standing on a beach and looking at the wide open sea. You can see the sky meeting the earth in a long even line. That line is called the horizon line (HL). Fun fact: The distance from us to the horizon line is a short 4.7km when standing on the ground and the eye level at 1.70m. To keep things simple at first, we can assume that the horizon is a continuous straight line that is always present, though, it can be obstructed by an object.
Now, when we sit down on the beach, we will notice the change of the horizon line. If we would be sitting in a lifeguard’s chair, you will find that the horizon rises with our height.
You’ll notice that the horizon is on the same height of your eyes. The height of the eyes is a very important factor in perspective drawing. Eye levels of differing heights can produce very different outcomes.
When beginning a perspective drawing, one of the first things to be established is the height of the eye level. Think of it being the framework of your drawing. On this framework, we’ll add vanishing points to construct our grid
Finding a hidden horizon line
If the horizon is for some reason hidden from you, there are at least two ways to establish the eye level. The first one requires a thin object such as a small book. Hold it horizontally and raise it up until you can’t see the top nor the bottom plane of the book. Look where the book cuts through your scene, that is where the eye level will be.
Another way to find a hidden horizon line is by looking at the horizontal vanishing lines and judge where they are not sloping downwards or upwards.
The Vanishing Point
Now imagine that you stand on a railroad track. You will notice that the tracks diverge to one point on the horizon line. This is called a vanishing point (VP). VP’s are where sets of parallel lines appear to vanish on the horizon line. Multiple VP’s in one single drawing are possible. That will brings us to different kinds of perspectives.
Sorts of Perspective
Three Axes
When constructing objects in p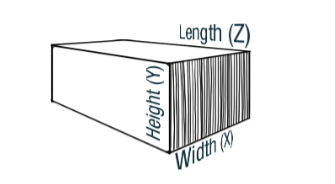 erspective, I like to keep three axes in mind. If we look at this box from a 2d top view we’ll see three visible sides with three sets of parallel lines. The width (x), height (y) and length / depth (z) lines.
One point perspective
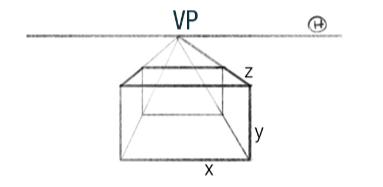
Here we have a box with two sides visible and one set of receding parallel lines (z). How can we find the vanishing point and the line of the eye-level?
We can easily find them by extending the lines representing the edges of the box. The vanishing point is where they meet. A horizontal line drawn through this point gives us the line of the horizon or eye-level.
Notice that in this one point perspective drawing the width lines (x) are parallel to the horizon line and the height lines (y) perpendicular to it.
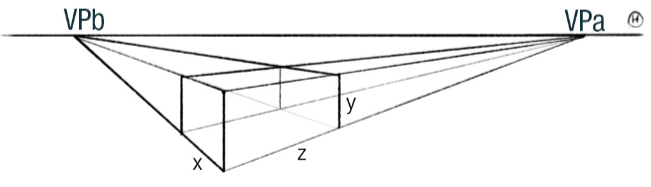
Two point perspective
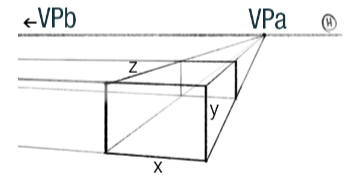 Now let’s rotate the box so that we can the side of the box. We have two receding parallel lines (x and z). Let’s extend the lines representing the edges of the box. We find two vanishing points. If we connect those points and draw through, we find the line of the horizon or eye-level. Notice that in a two-point perspective the height lines (y) are perpendicular to the horizon line.
 If we turn the box some more, you will notice that one vanishing point moves along the horizon line and the other one moves towards the box. When the point comes directly above the box we have again one set of receding parallel lines (z). The other set is parallel with the horizon (x). We’ll have a one-point perspective drawing again.
Three-point perspective
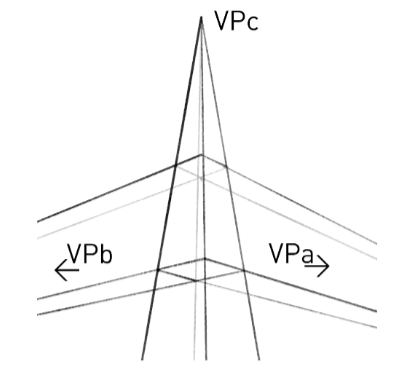 Now let’s have a look at the third set of parallel lines (y). In one and two point perspective, the height lines (y) can be considered as perpendicular lines to the horizon line because we can only see a small segment of them.
If we start converging these lines to a third vanishing point, we become a three-point perspective. Three-point perspective is often used to emphasize an object’s height or depth.
Conclusion
To test your perspective drawing skills, it’s a good exercise to draw boxes in two and three point perspective freehand until it becomes second nature. Vary the sizes and rotations of the boxes. Fill ten pages of those. Don’t rush yourself through the process. If needed start with plotting out the horizon line and vanishing points but get rid of those as quickly as possible.
I also recommend the following books to read on the topic of perspective:
- Perspective Made Easy – Ernest R. Norling: Small book to read in when you have some time off. Easy to pick up and it reads like a train.
- How to Draw: Drawing and Sketching Objects and Environments from Your Imagination – Scott Robertson: A lot more complex than the previous one but a must have when you want to take your perspective skills further than the basics.
And off course, no better way to learn than joining the Weekly Challenges Facebook group! Post your studies there and comment on others so we all benefit from it.
Good luck!