Hello everyone!
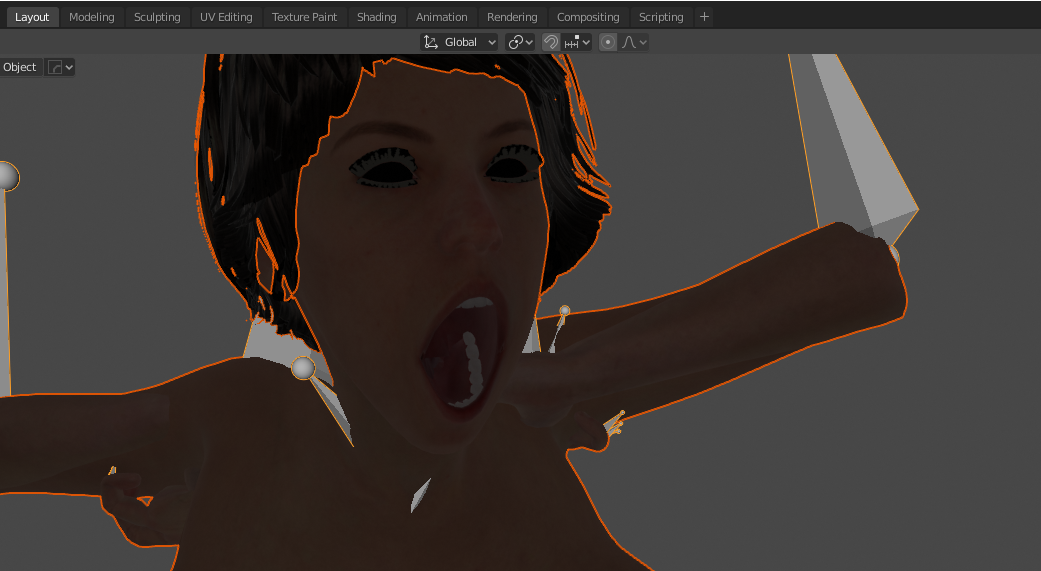
In my previous post I ended with the top image. This happened to me when importing an animated character to Blender 2.82. I’m searching for a workflow to quickly add a 3d textured (and animated) character to my 3d scenes. The animation can help me to easily choose different poses for the character in the environment so I can take screenshots of different views and do overpaints on them in Photoshop.
The fun fact is that something similar already happened to me somewhere around a year ago and I could not remember how I fixed it. In short, it took me around three days to figure everything out again. So I’m writing this overview for myself and anyone who wants to try the same, and hopefully, things will go smoother for you!
Creating an animated character in Blender 2.8
Downloading free 3d characters is easy, but finding animated and textured quality characters is something different. I remembered seeing some clothed characters available for download on Artstation a while ago. The available downloads are Marvelous Designer projects with a textured and dressed figure, no animation included.
My goal is to add an animation to the character and also make the garments follow the character.
Here is an overview of the different steps I’ll go through:
- Export the custom character as .obj from Marvelous Designer to Blender
- Export the character as .obj from Blender to Mixiamo to add a rig to the character
- Export the rigged character from Mixamo to Blender as .fbx’s (export original pose and animation)
- Combine the .fbx’s in Blender and export as Alembic (.dae) to Marvelous Designer
- Record the garments animation in Marvelous Designer and export the animation as .mmd
- Overlay the animated character with the animated garment in Blender
I will explain each step in a chapter. For each step in the process, I tried different options (with or without success), so I will name these too if there are any.
STEP 1: Export the avatar from Marvelous Designer
In this first part, you’ll need to extract a character model to add animations to.
In this YouTube video by Travis Davids, there is a great explanation of how to export DAZ3D models and how to add animations to them. I followed that tutorial for a while but then realized I could just use the provided character from the Marvelous Designer (MD) project. The DAZ3D character has a T-pose where the MD character is standing in a 45°-pose. Using the original character will save you time manually adjusting the character later.
Because there aren’t any animations yet, you can just export the character (called avatar in MD) as an obj file. There are other export options available but those gave me the wrong results.
Delete the garment and go to Export – OBJ.
STEP 2: Export an optimized character .obj from Blender to Mixamo
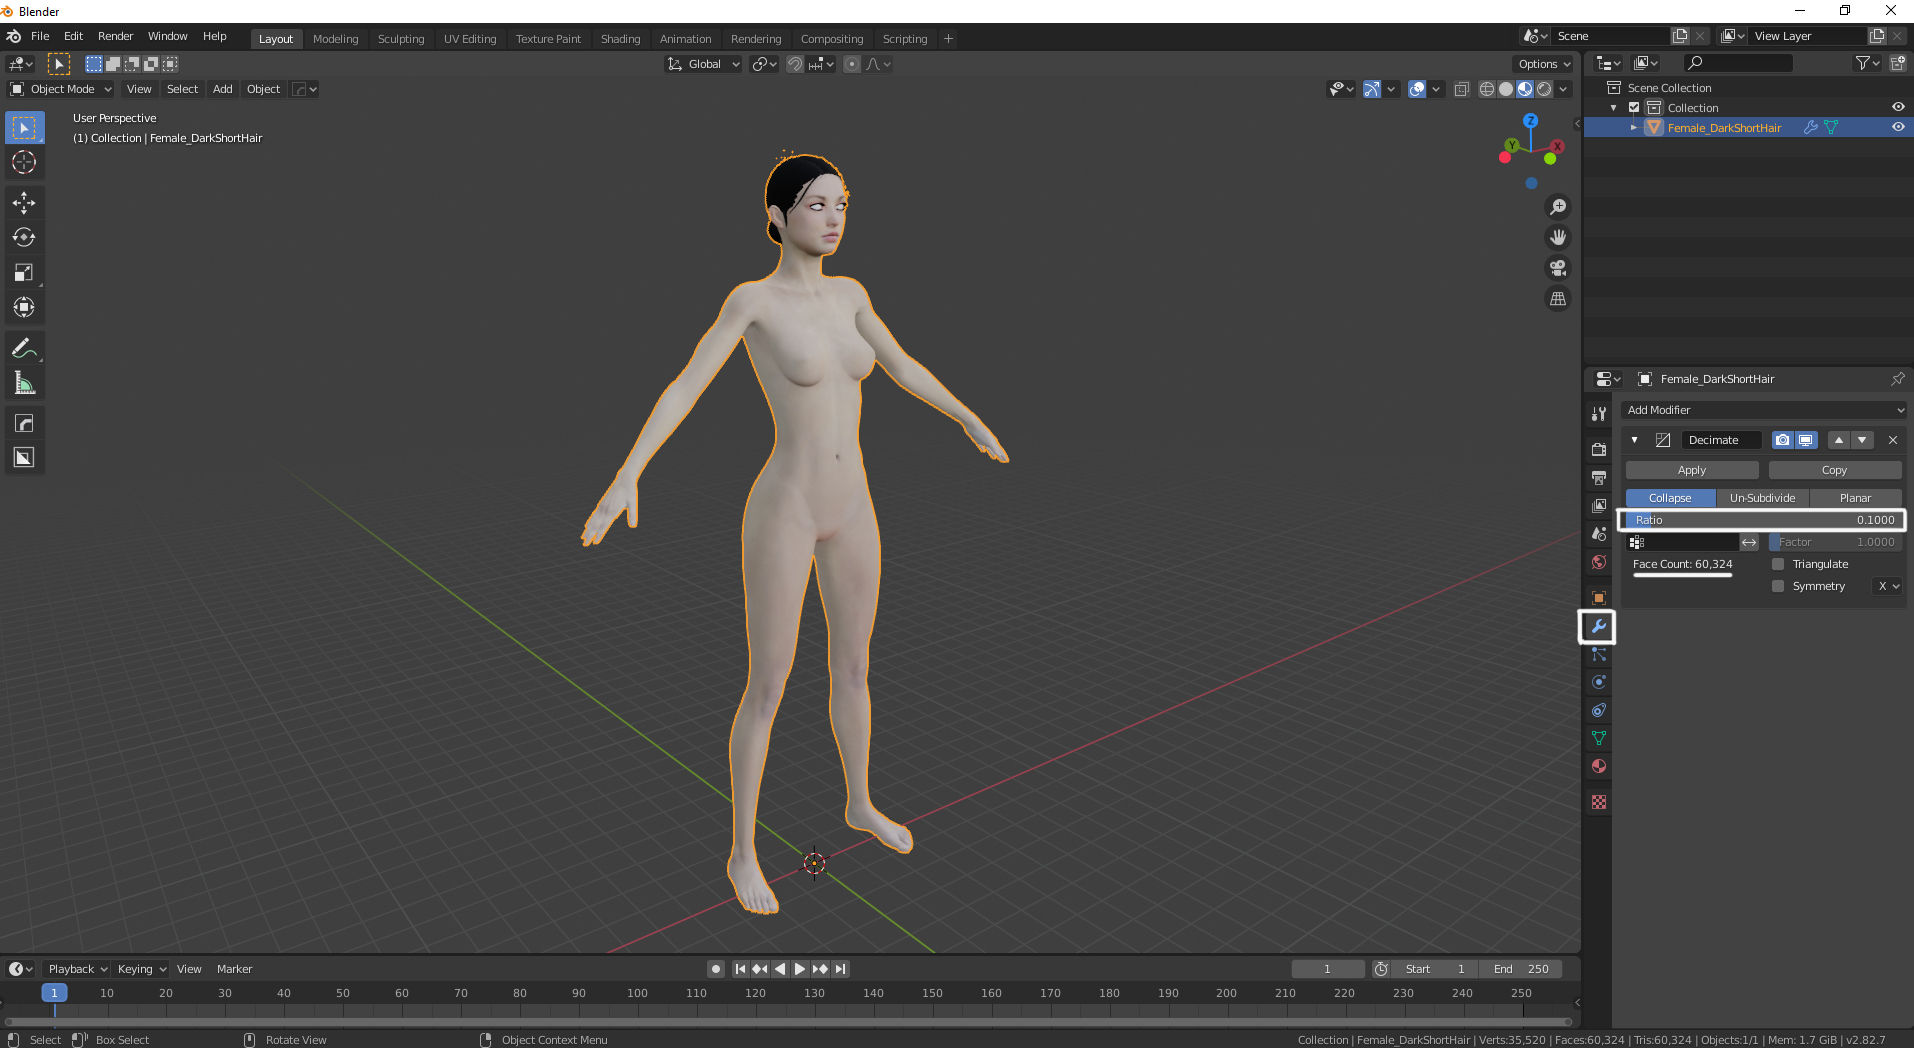 In this part, you first have optimize your character .obj to import it successfully to Mixamo. Mixamo is a website with a rigging algorithm and free to use animations. I’ve been using it already in other projects
To be able to export the character .obj to Mixamo without errors, you first have to optimize the model. In this case, that means making it more low-poly.
In Blender, select the mesh and add a Decimate modifier to it. I’m not sure what the max amount of faces is Mixamo can handle, I would say aim below 100k. Apply the modifier to take effect.
Once that is done, check if the materials of your character load successfully by switching to the Material Preview or Rendered shading. You’ll need those materials later.
For now, save the decimated version and then you’re ready to export the optimized .obj to Mixamo.
STEP 3: In Mixamo, add a rig and download an animation
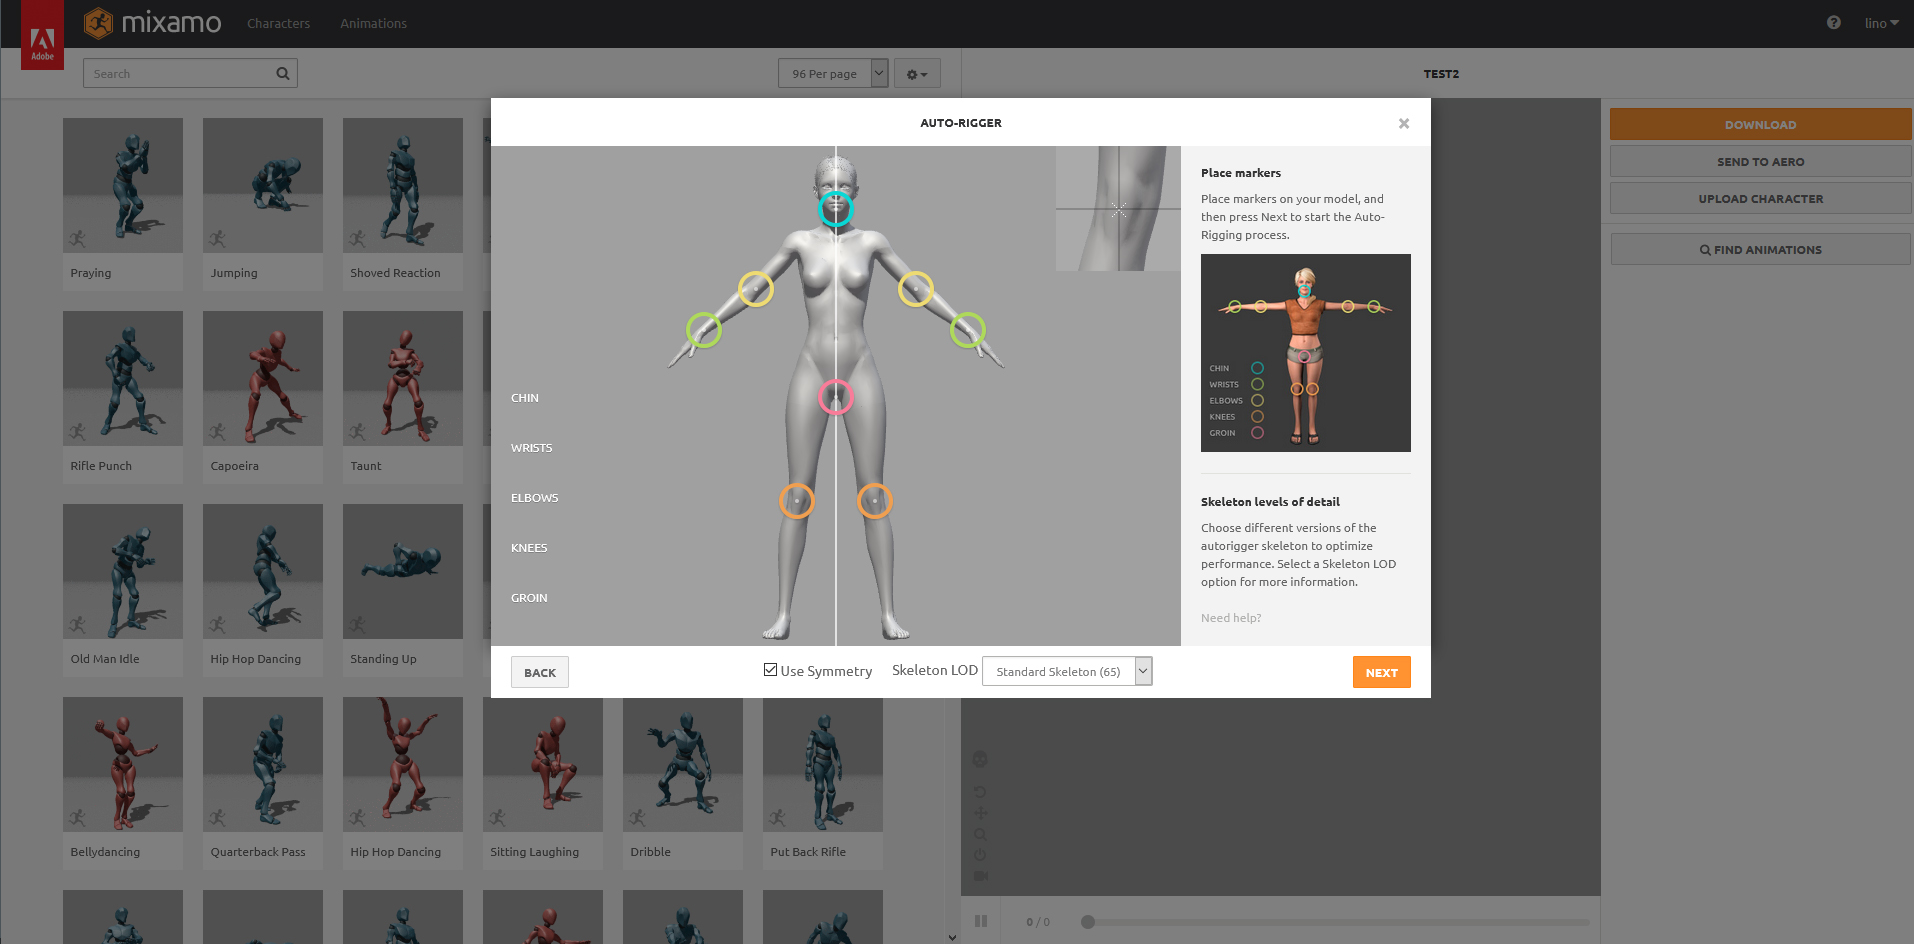
In this chapter, first you need to add a rig to the character. Without a rig, there can’t be an animation. Second, you need to download our preferred animation.
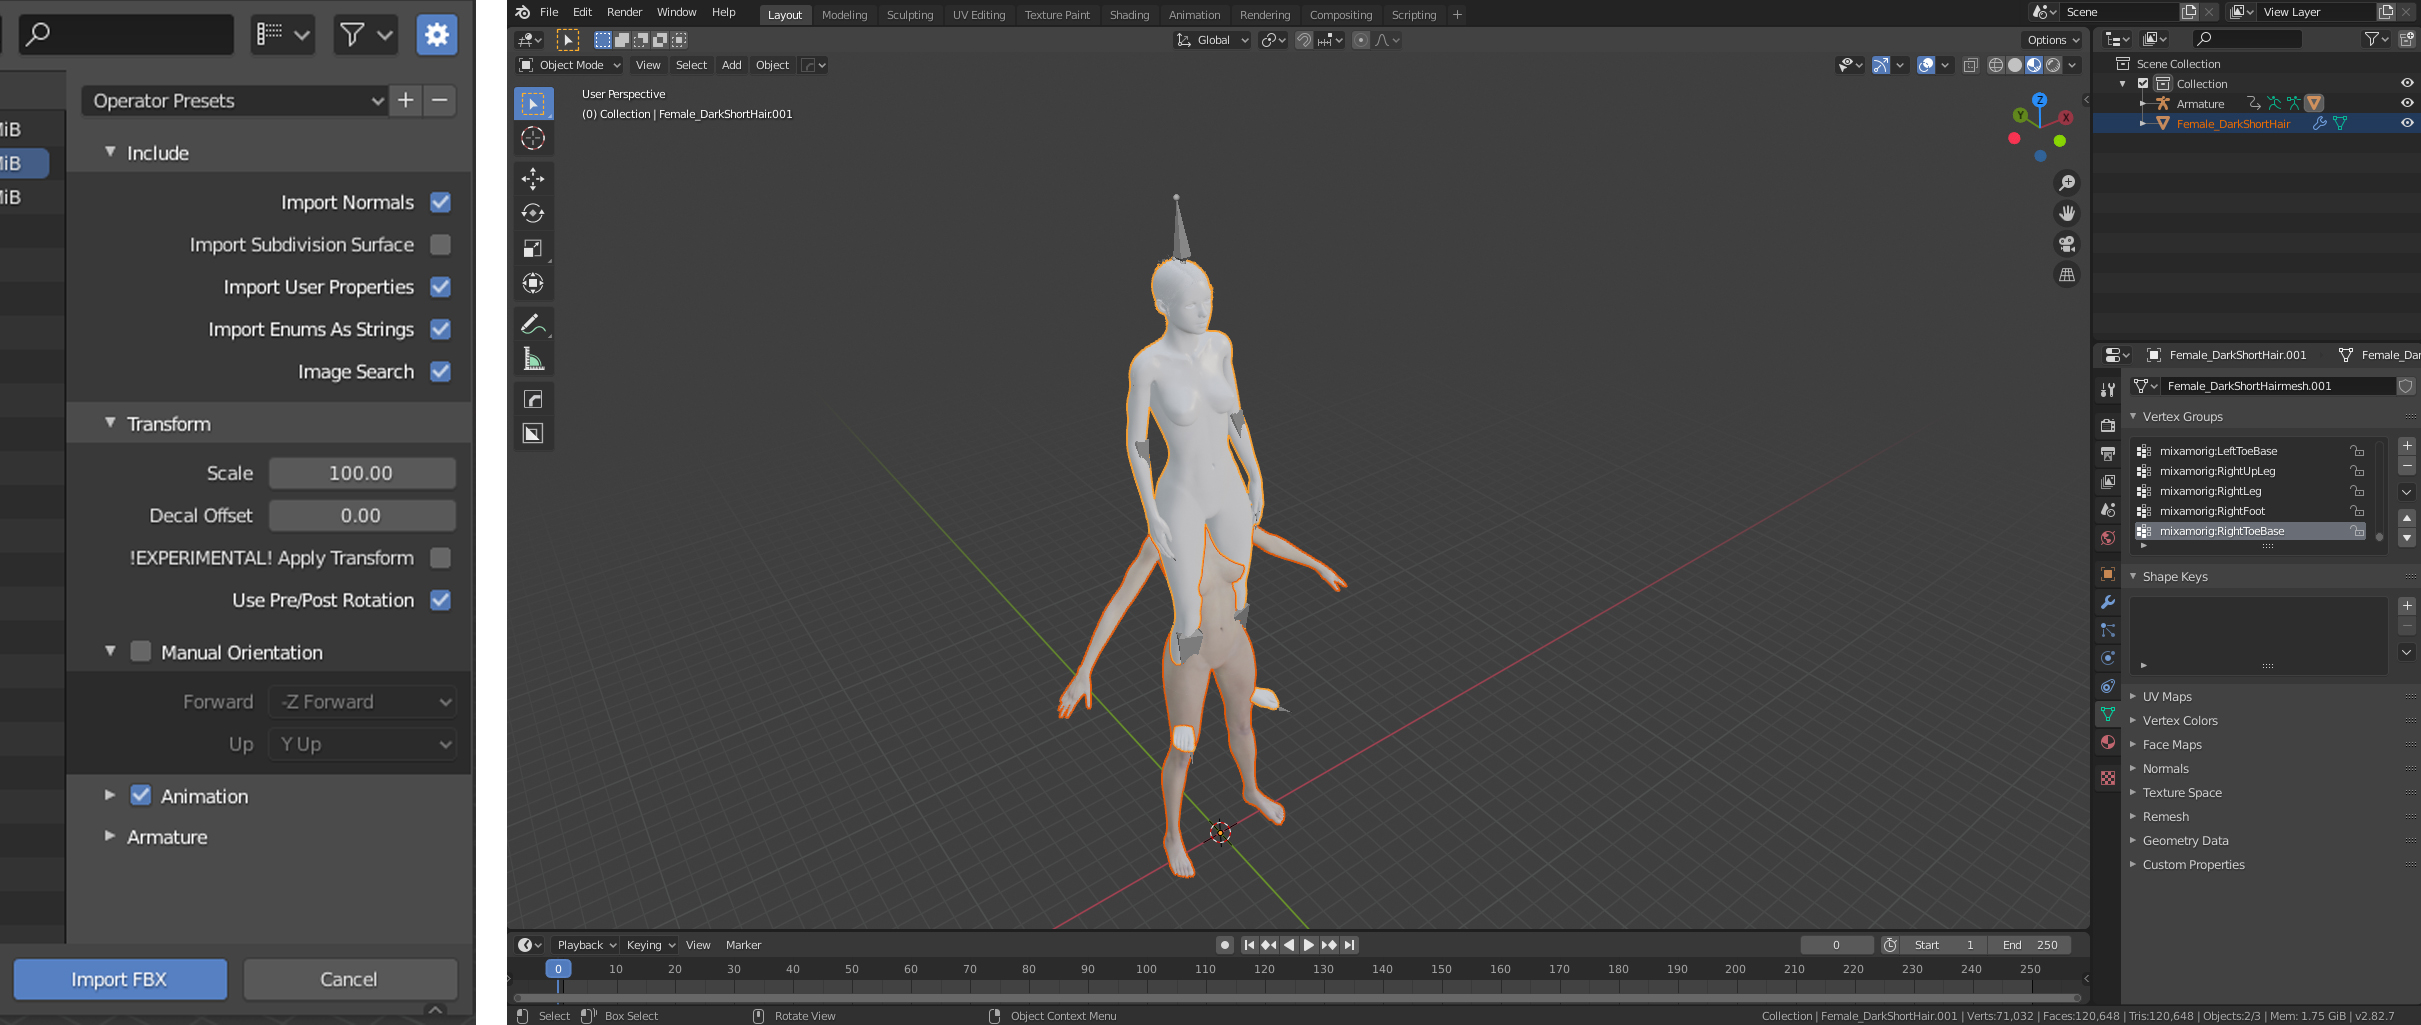
Go to the Mixamo website. Log in or create an Adobe account to continue. Choose for Upload Character. Mixamo allows uploads of .obj’s, .fbx’s, and zip’s.
Zip’s are used when you want to upload a character with textures. Include an .obj and the texture files in the .zip (not .rar, it won’t work). In my case, I’m only interested in creating a rig for my character. I will tackle the texturing and shading in Blender.
Uploading a .fbx file keeps giving me errors, maybe that’s a Blender Mixamo thing, I don’t know.
See if the character is positioned upright and is facing to the front. If not, it is better to change the export settings in Blender so the character is positioned correctly when importing later.
Follow the directions to allow for the rigging algorithm to make an armature. After it finishes, you can select your preferred animation and download the animation as .fbx. with skin.
STEP 4: Add the original pose to the animation in Blender
In this chapter,you need to add the original 45°-pose to the animation. You need the 45°-pose so you can later on animate the clothing in Marvelous Designer. Without the original 45°-pose on frame 1, the clothes will not correspondent correctly with the figure.
Import the animation.fbx in Blender. Use File – Import – FBX. You want to put the scale on 100. I selected the jump animation, that is why my character is a bit higher up at frame 1.
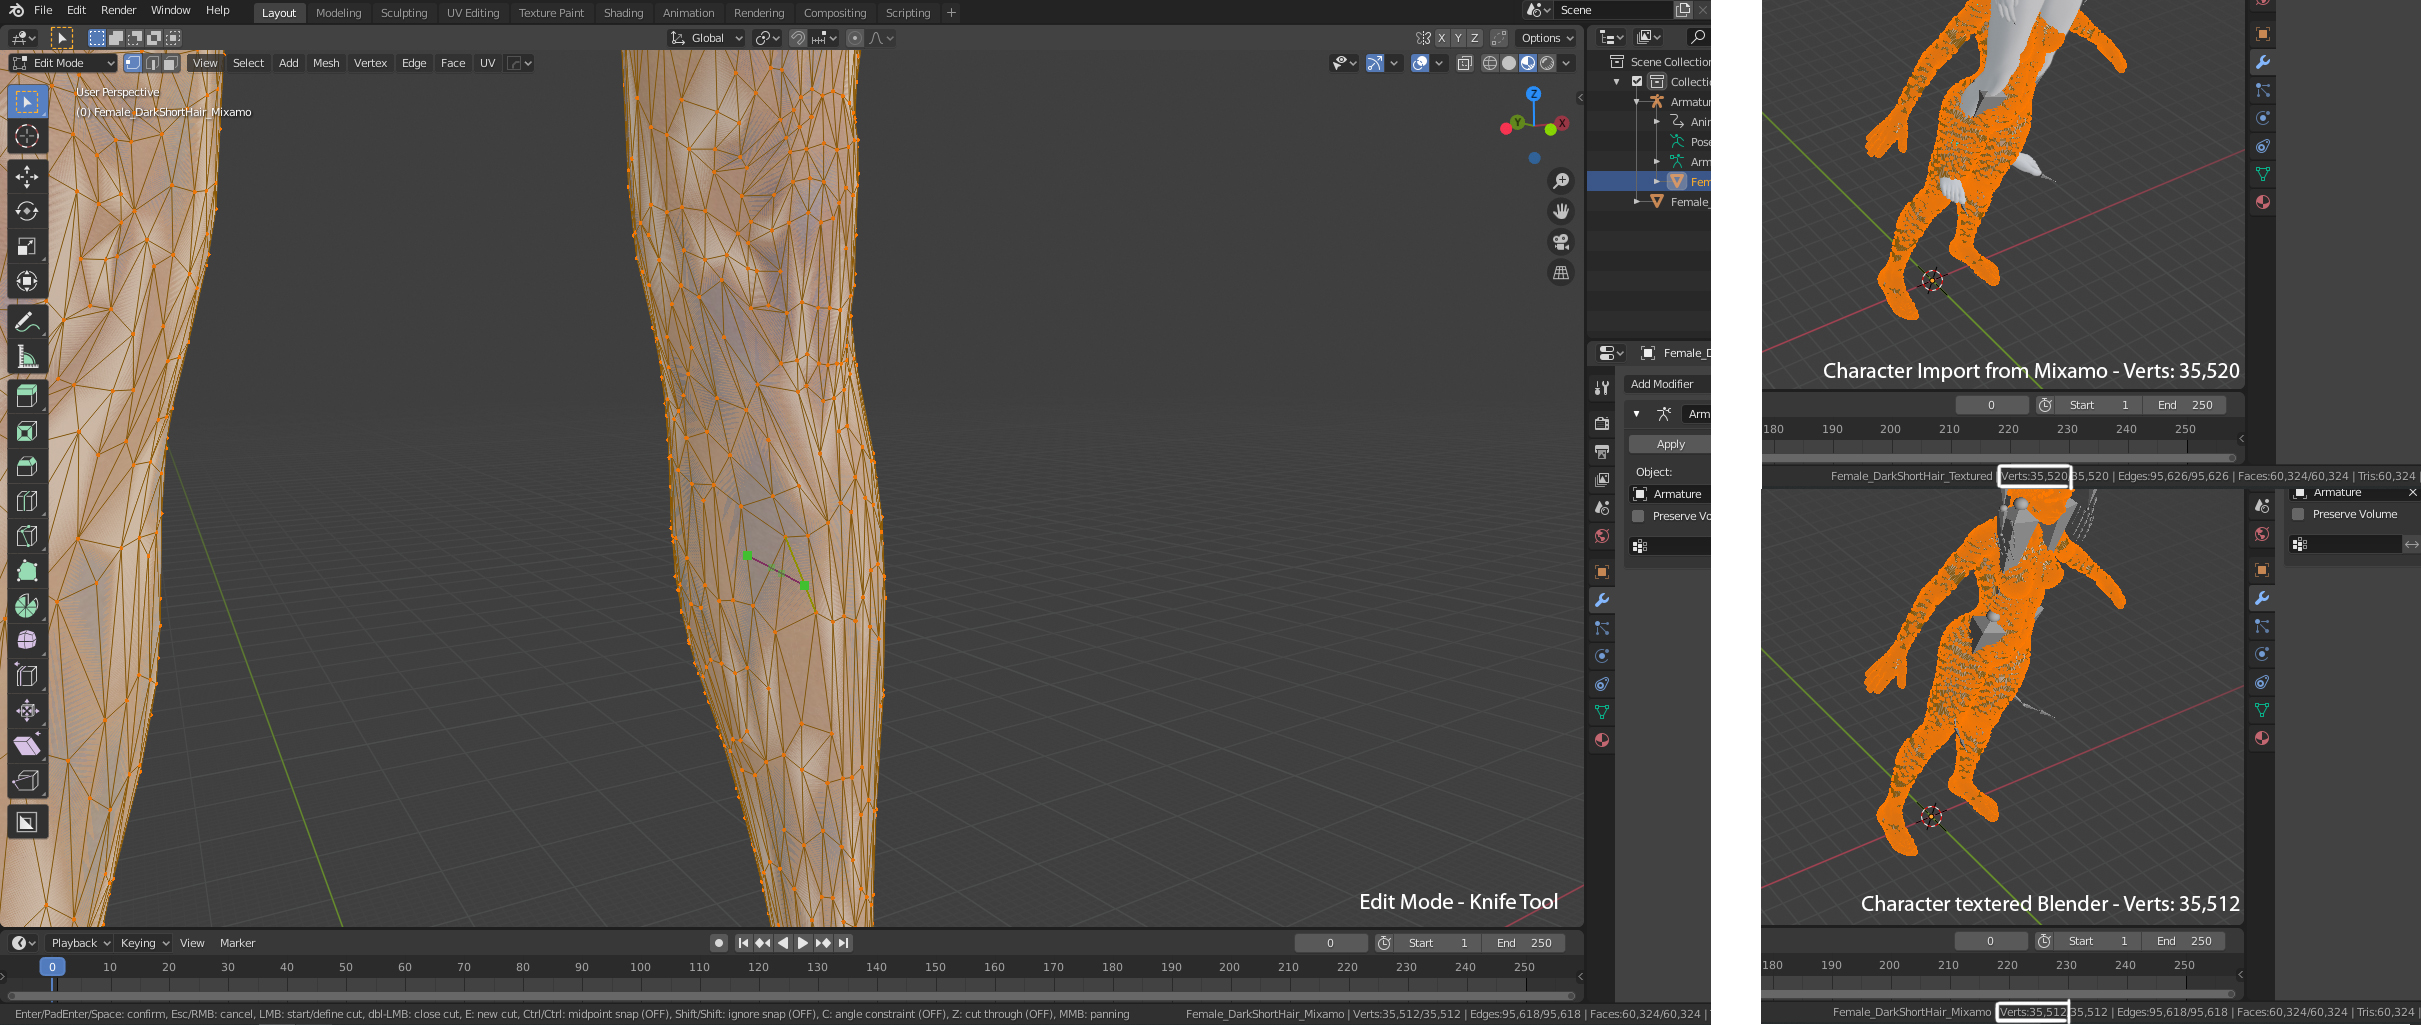
Blender will import a greyscale character with an armature. I order to move the vertices of the character and therefore have animation, the armature is linked to Vertex Groups. You need to copy the Vertex Groups of the animated character to our textured character. This is only possible when the character meshes are identical thus having the same amount of vertices. Importing the .fbx tends to mess that up for me so you need to check the vertex count first of both meshes. In the example, while importing the character back from Mixamo, it lost 8 vertices along the way. With the Knife tool in Edit mode, you can easily add 8 new vertices.
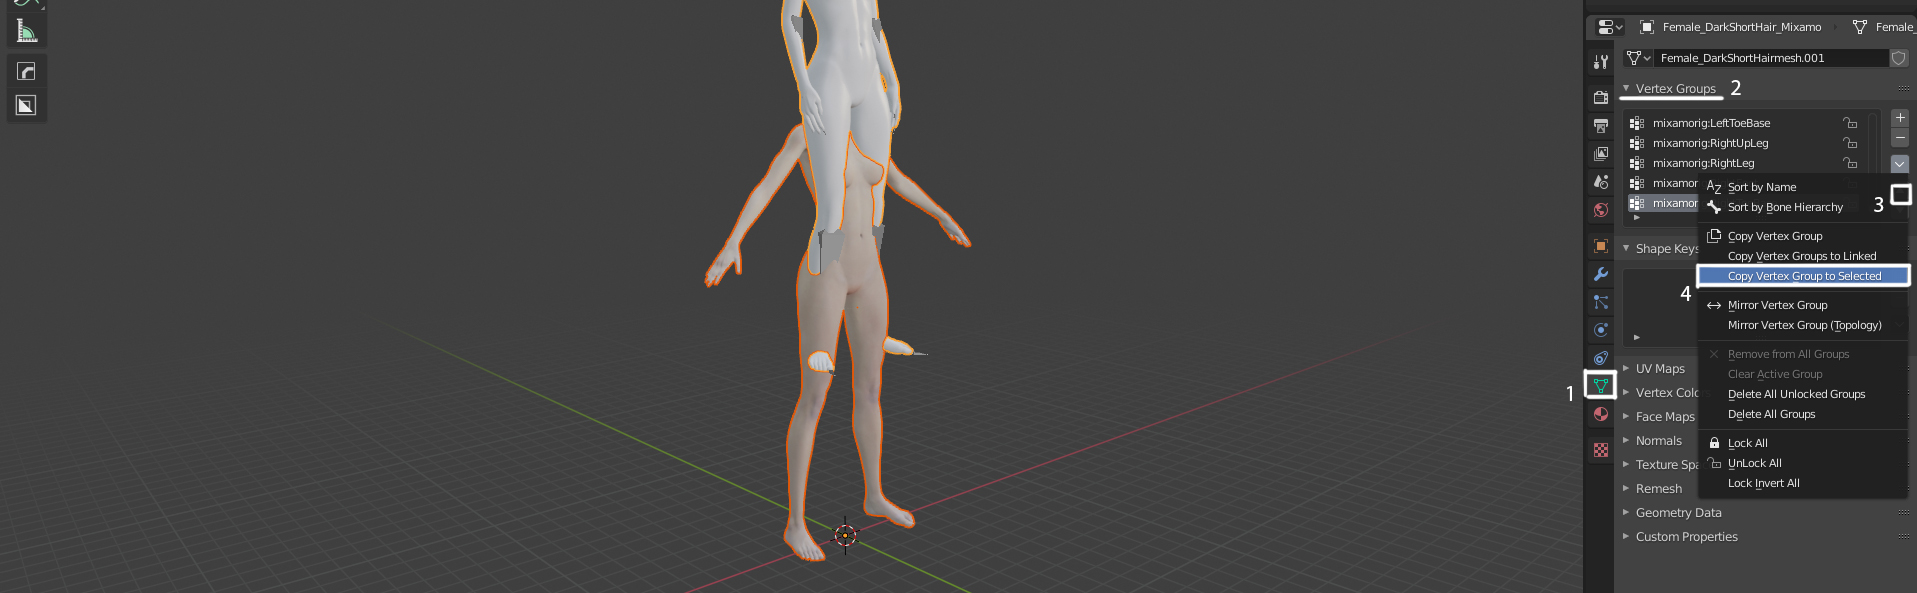
Once both meshes have the same vertex count, you can proceed to copy the Vertex Groups data. Select your textured character first, select the grey character second. Navigate to its Object Data Properties and under Vertex Groups, click the arrow (Vertex Groups Specials).
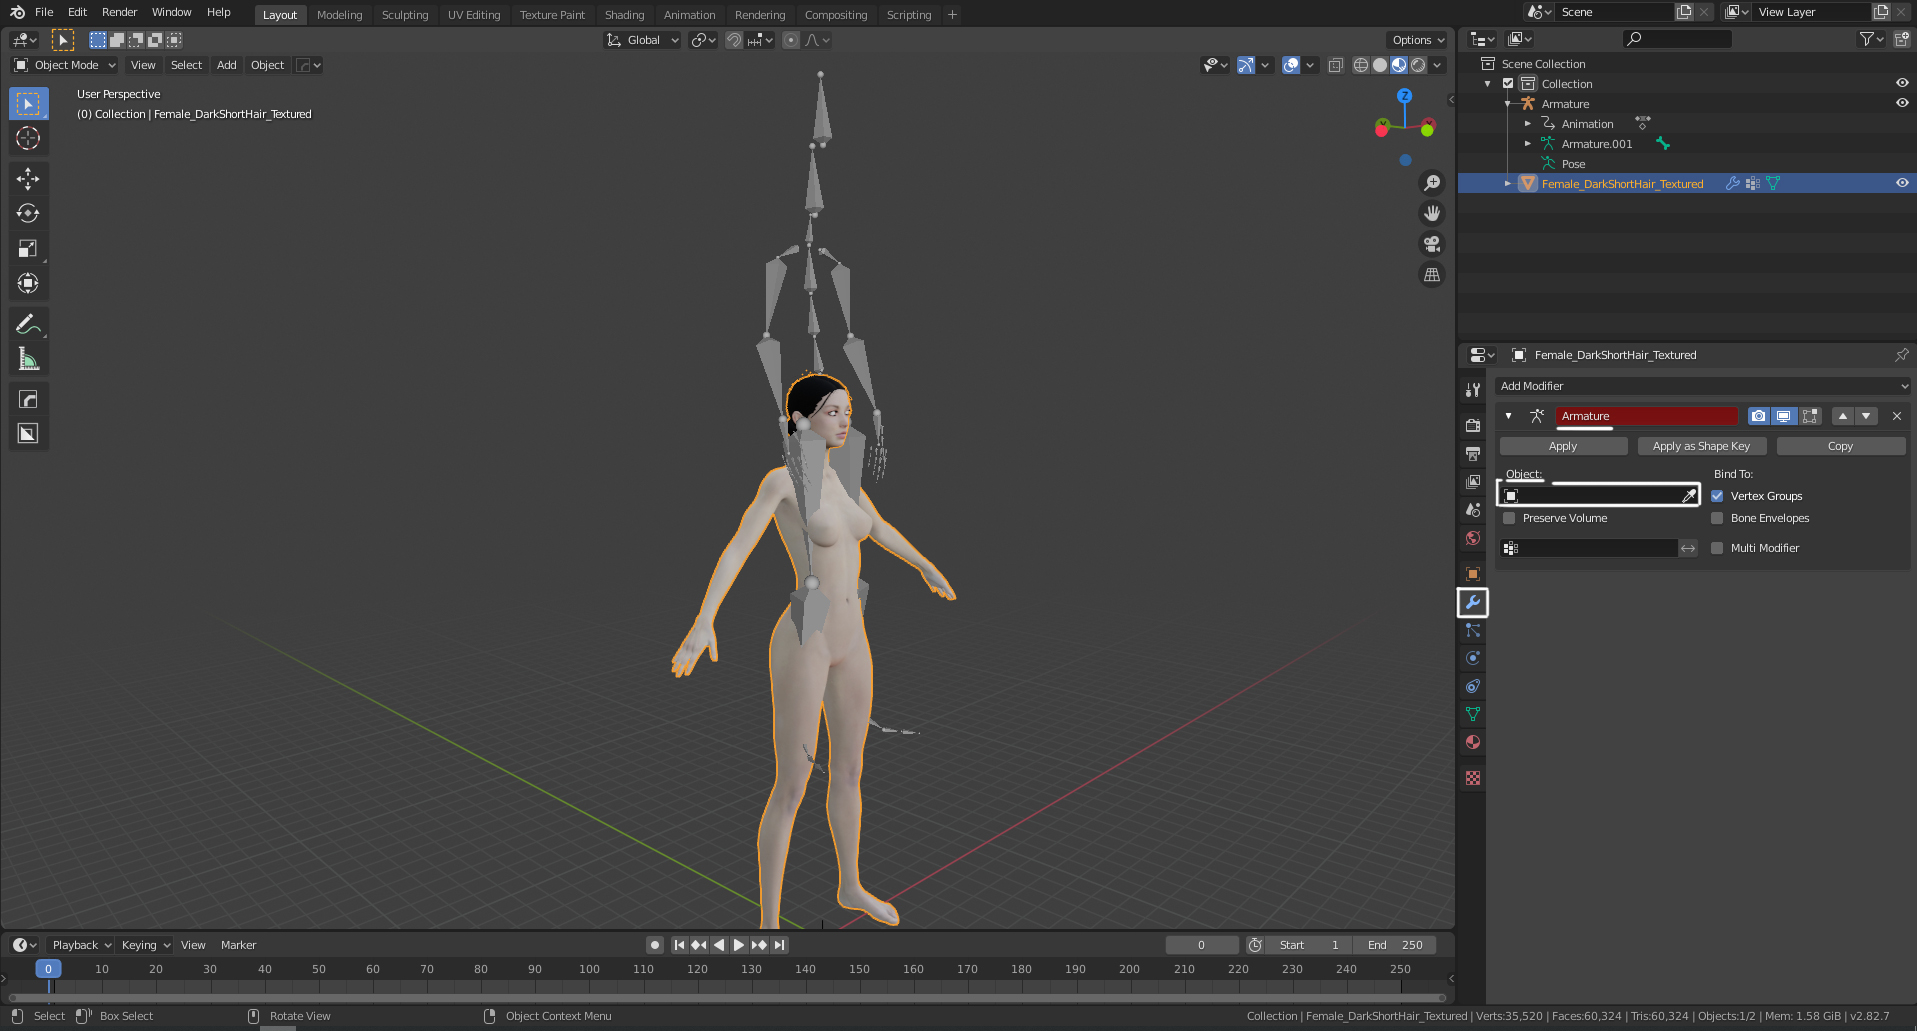
Delete the greyscale character. Right now you need to link the armature to the textured character by adding an Armature modifier. Under object, link the object to the armature.
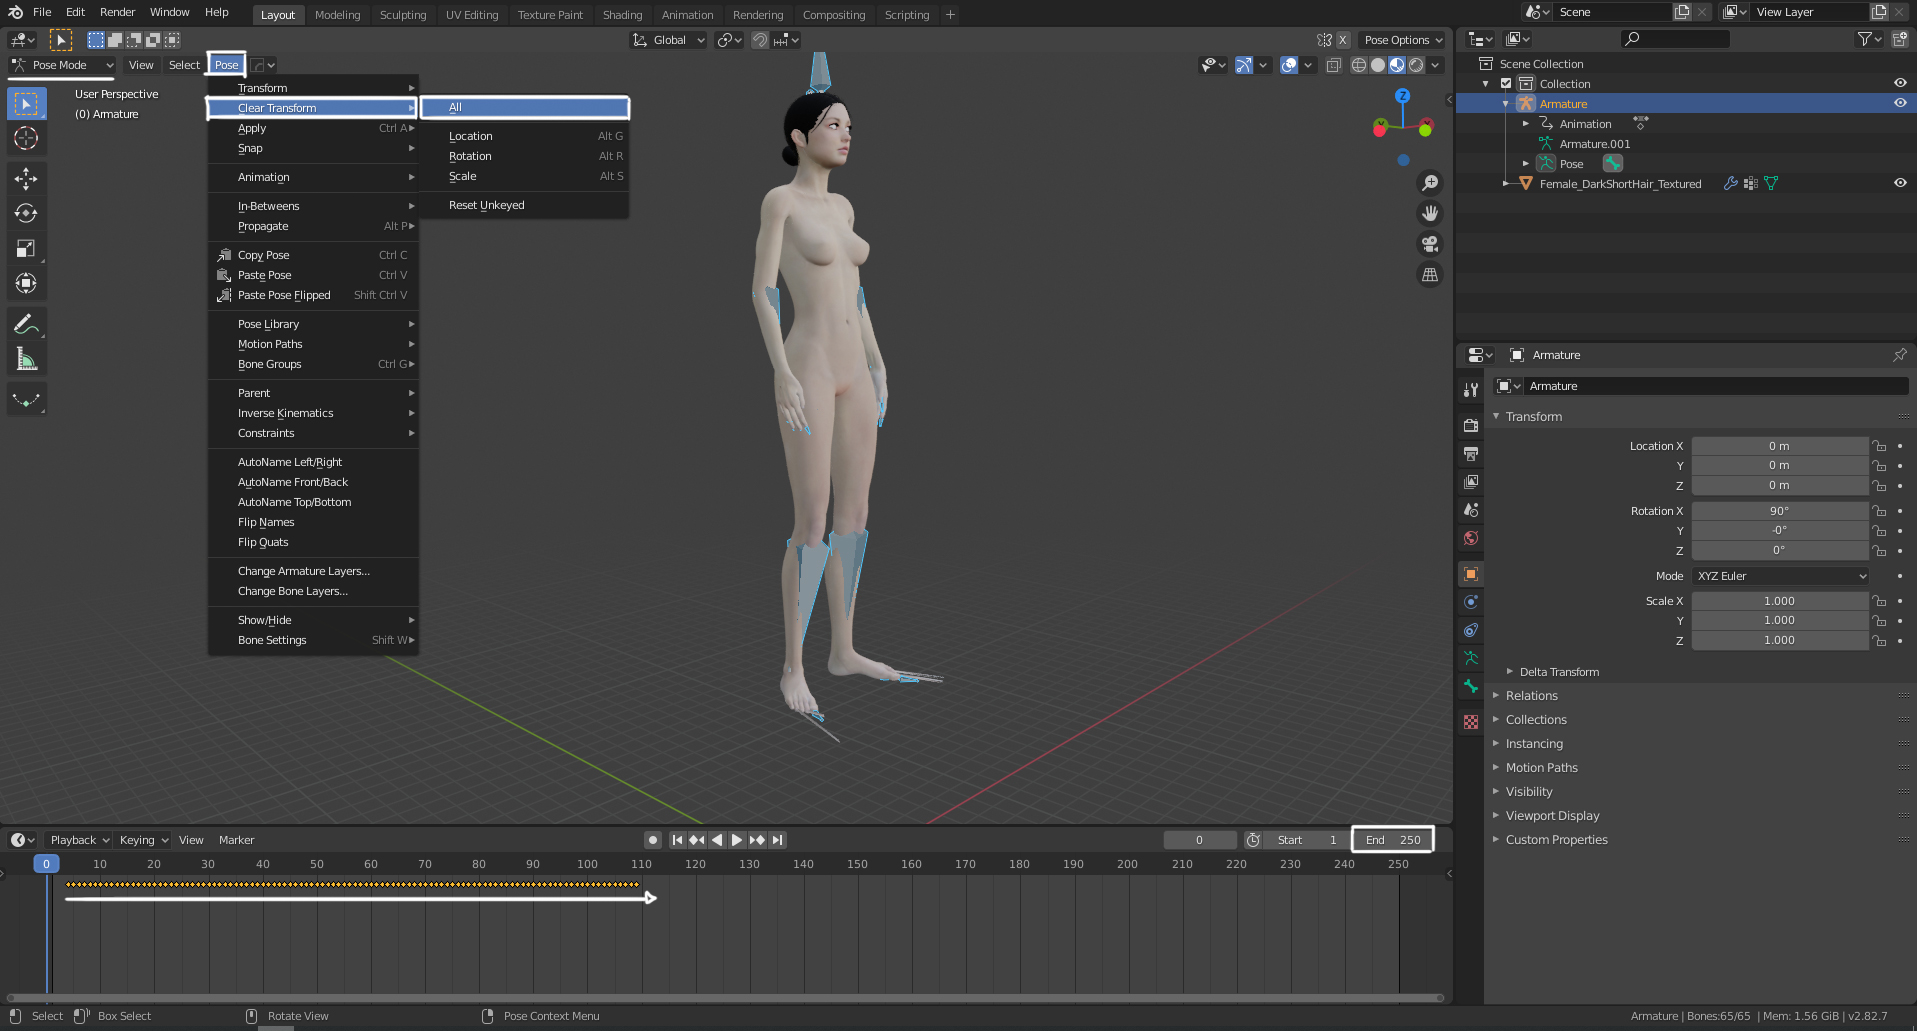
Select the armature, and in Pose-mode, rotating a bone will show a rotation on the character.
Right now you need to add the V-pose at frame 1. Still in Pose-mode, select all the bones and open up the Timeline. Move all the keys to the right. Set the timeline on key 1 and reset all the transformations by selecting Pose – Clear Transform – All. Key the reset by pressing key ‘I’. Select Available. Make sure the ‘default pose’ is set on frame 1.
Right now, the pose is reset and when playing the animation from the start, the 45°-pose will transform to your downloaded animation. Put the end of the timeline at the end of the animation.
Time to export this to Marvelous Designer to create the animation on the clothing. I use Export – Alembic to export my character. Exporting as an .FBX keeps giving me scale issues in MD
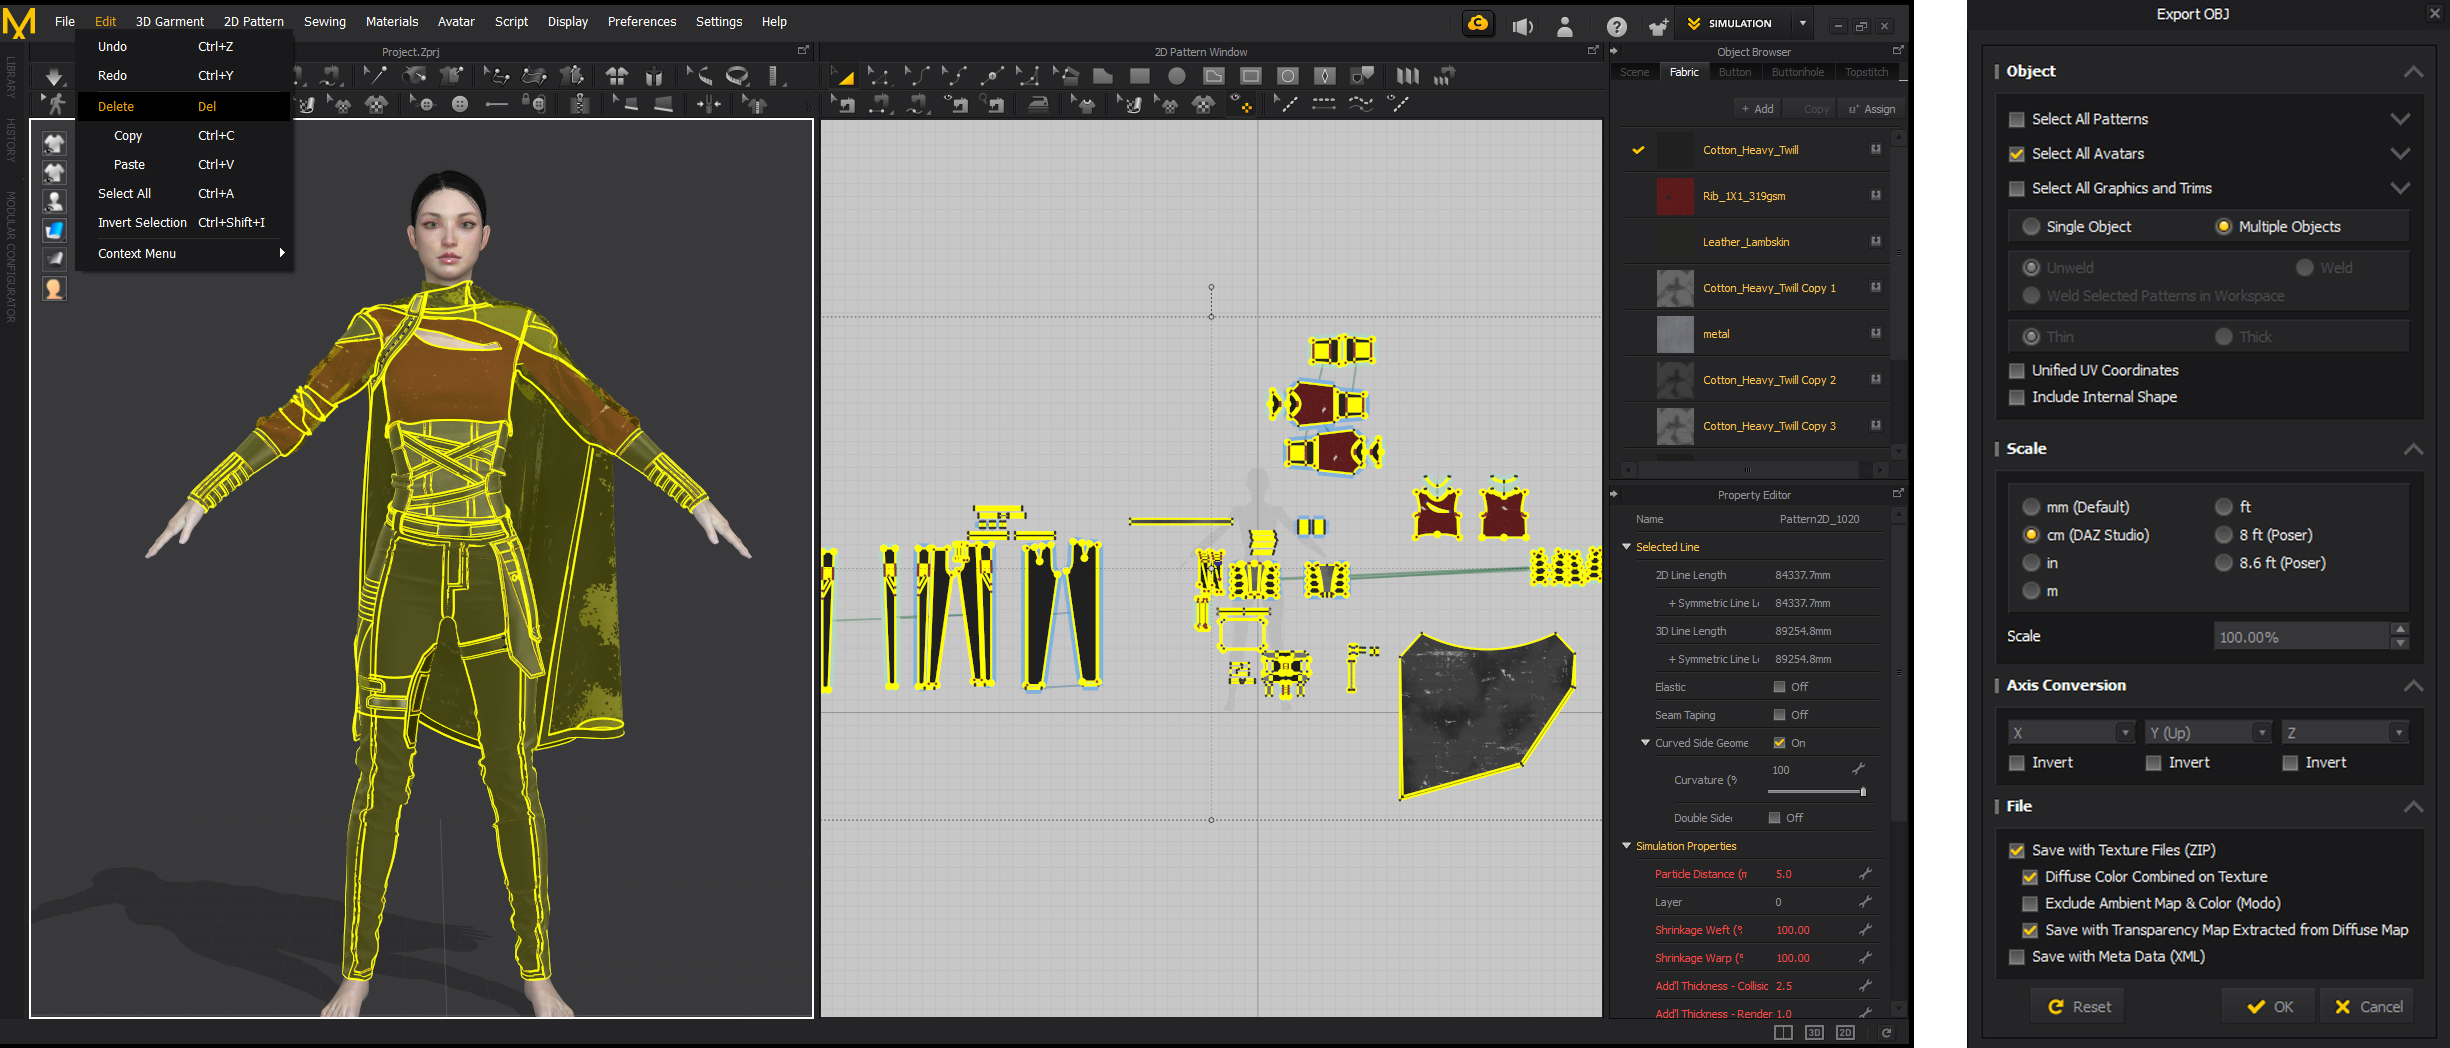
STEP 5: Animate the garment in Marvelous Designer
In this chapter, You’re going to animate the garments in Marvelous designer.
In Marvelous Designer, you need to change the avatar with one that has animations to it. Go to File – Open – Avatar to load your Alembic File. Select the frame rate and remember it – you might need it in the next chapter. Make sure the clothes are fitting nicely around the avatar. If not, you want to check the scaling settings of your export and import.
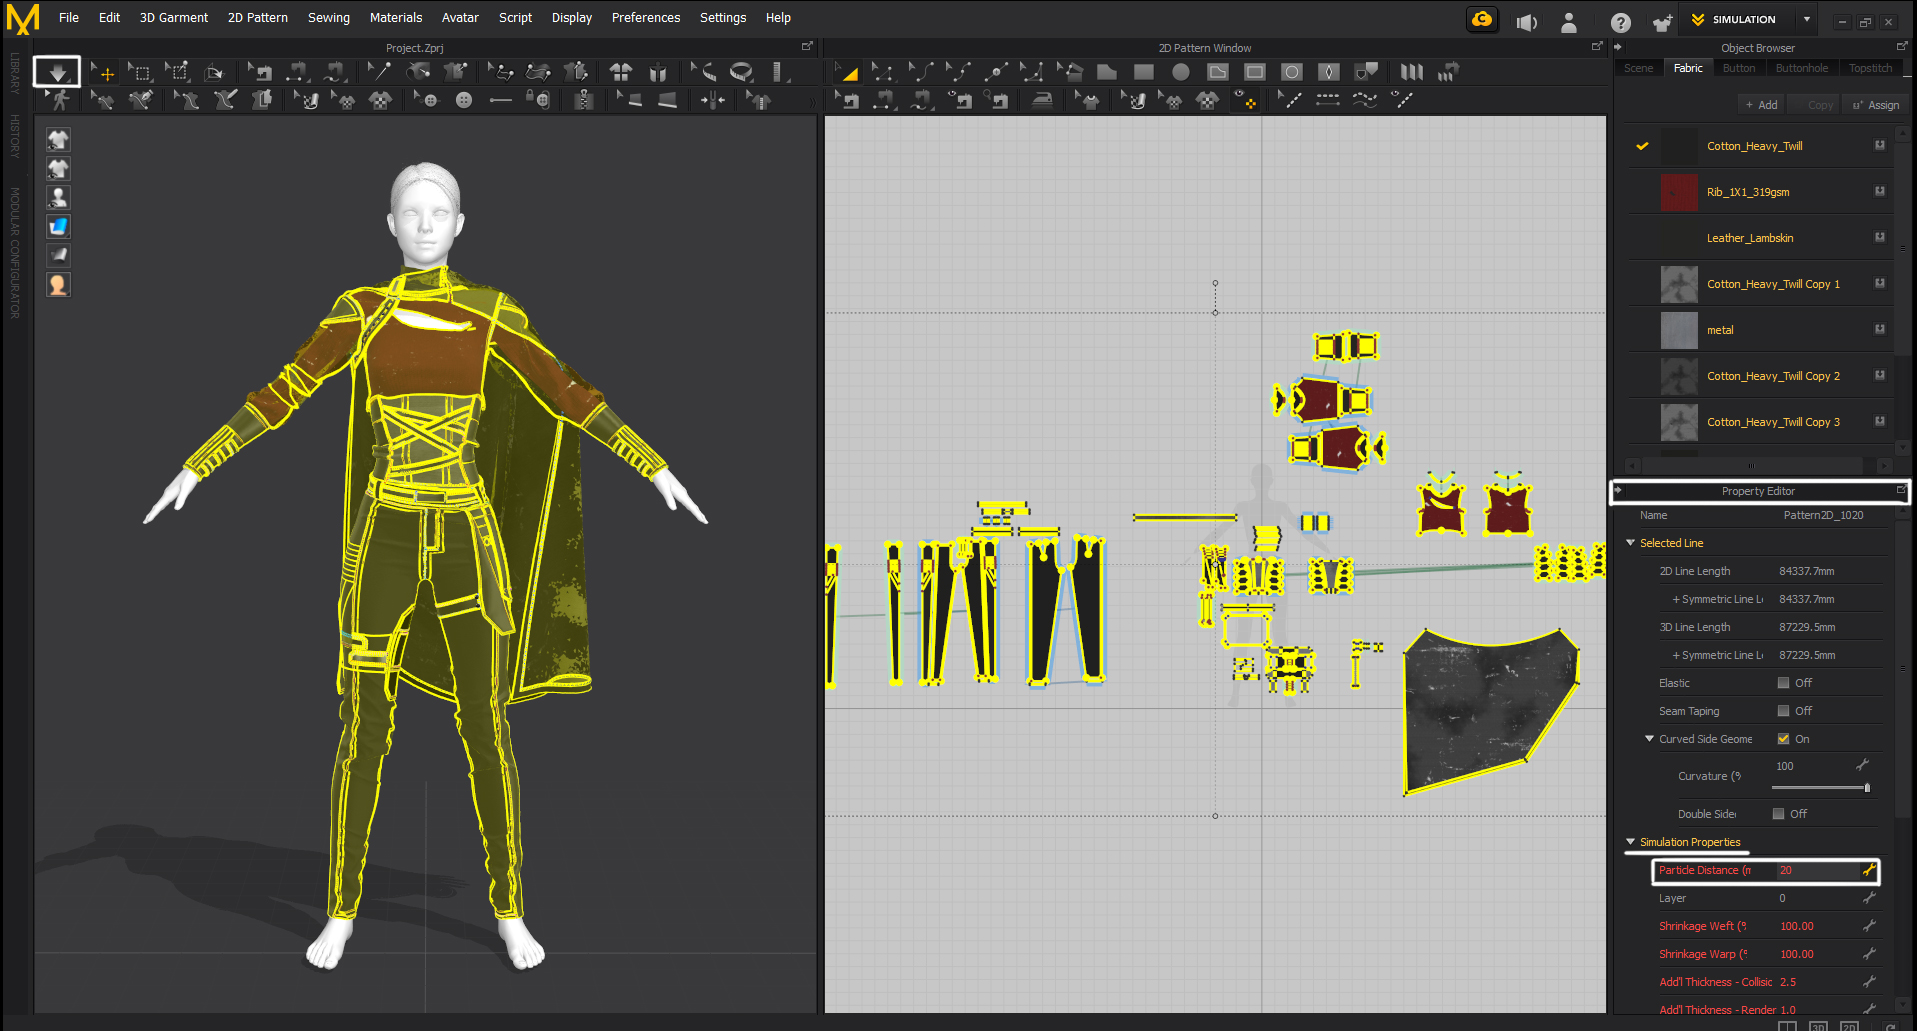
To see if everything fits nicely, you need to simulate gravity on the clothes (Spacebar). Under the Simulation Properties, you can put the Particle Distance on 20 for a quicker but less strict result (Select all and navigate to the Property Editor). Once done, open the Animation viewport (Top-Right) and record the animation.
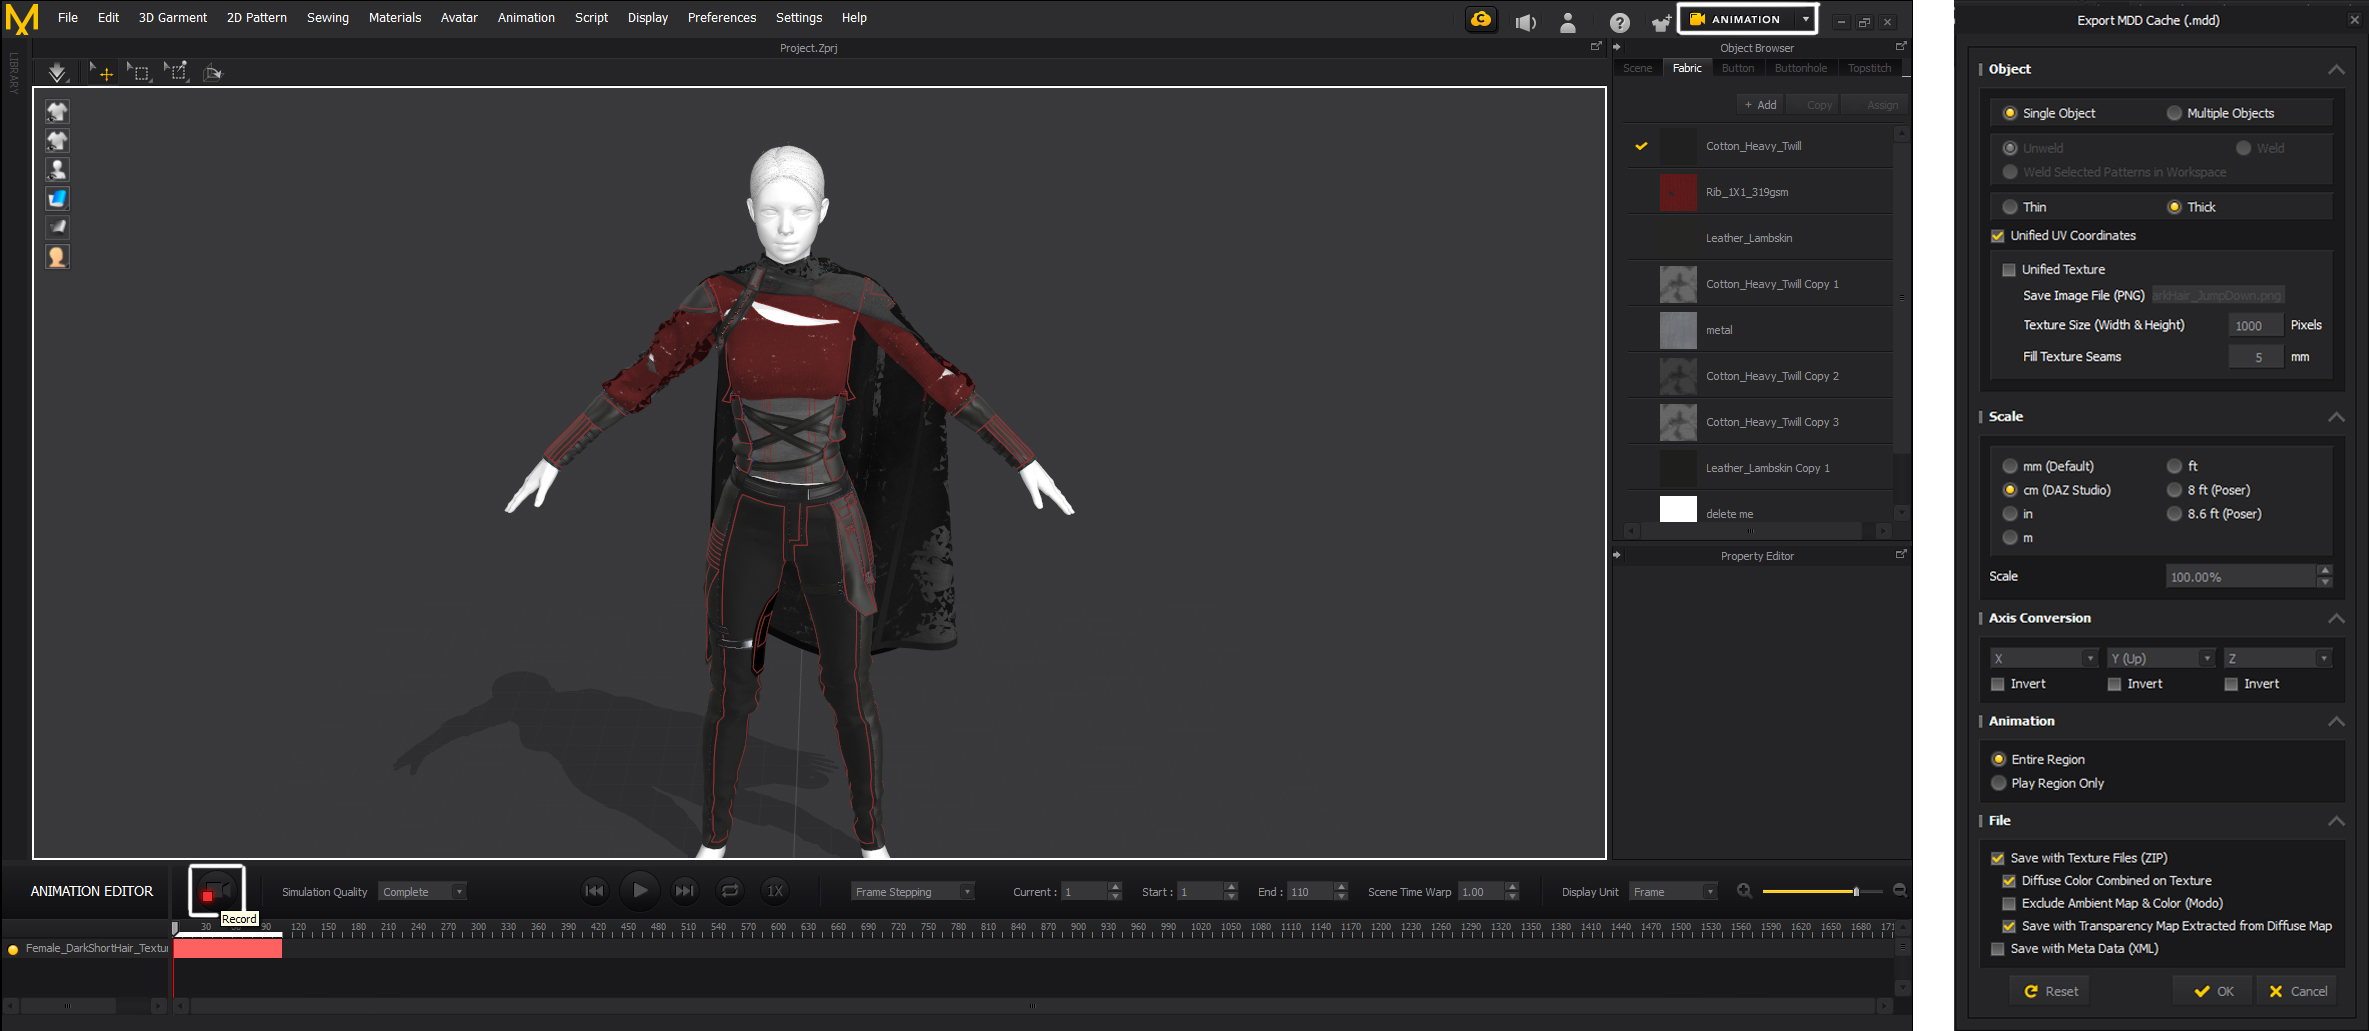
When the recording is done, export the animation. I use Export – MMD Cache. You can also try to export as a .FBX but that gives me no animation in Blender (apparently, baking the animation in Blender should be the solution but still…). Exporting an Alembic file works too but then all textures are lost and everything will be one mesh. This is ok if you don’t have any textures on your garments and you want to texture them later.
Step 6: Import the animated garment to Blender 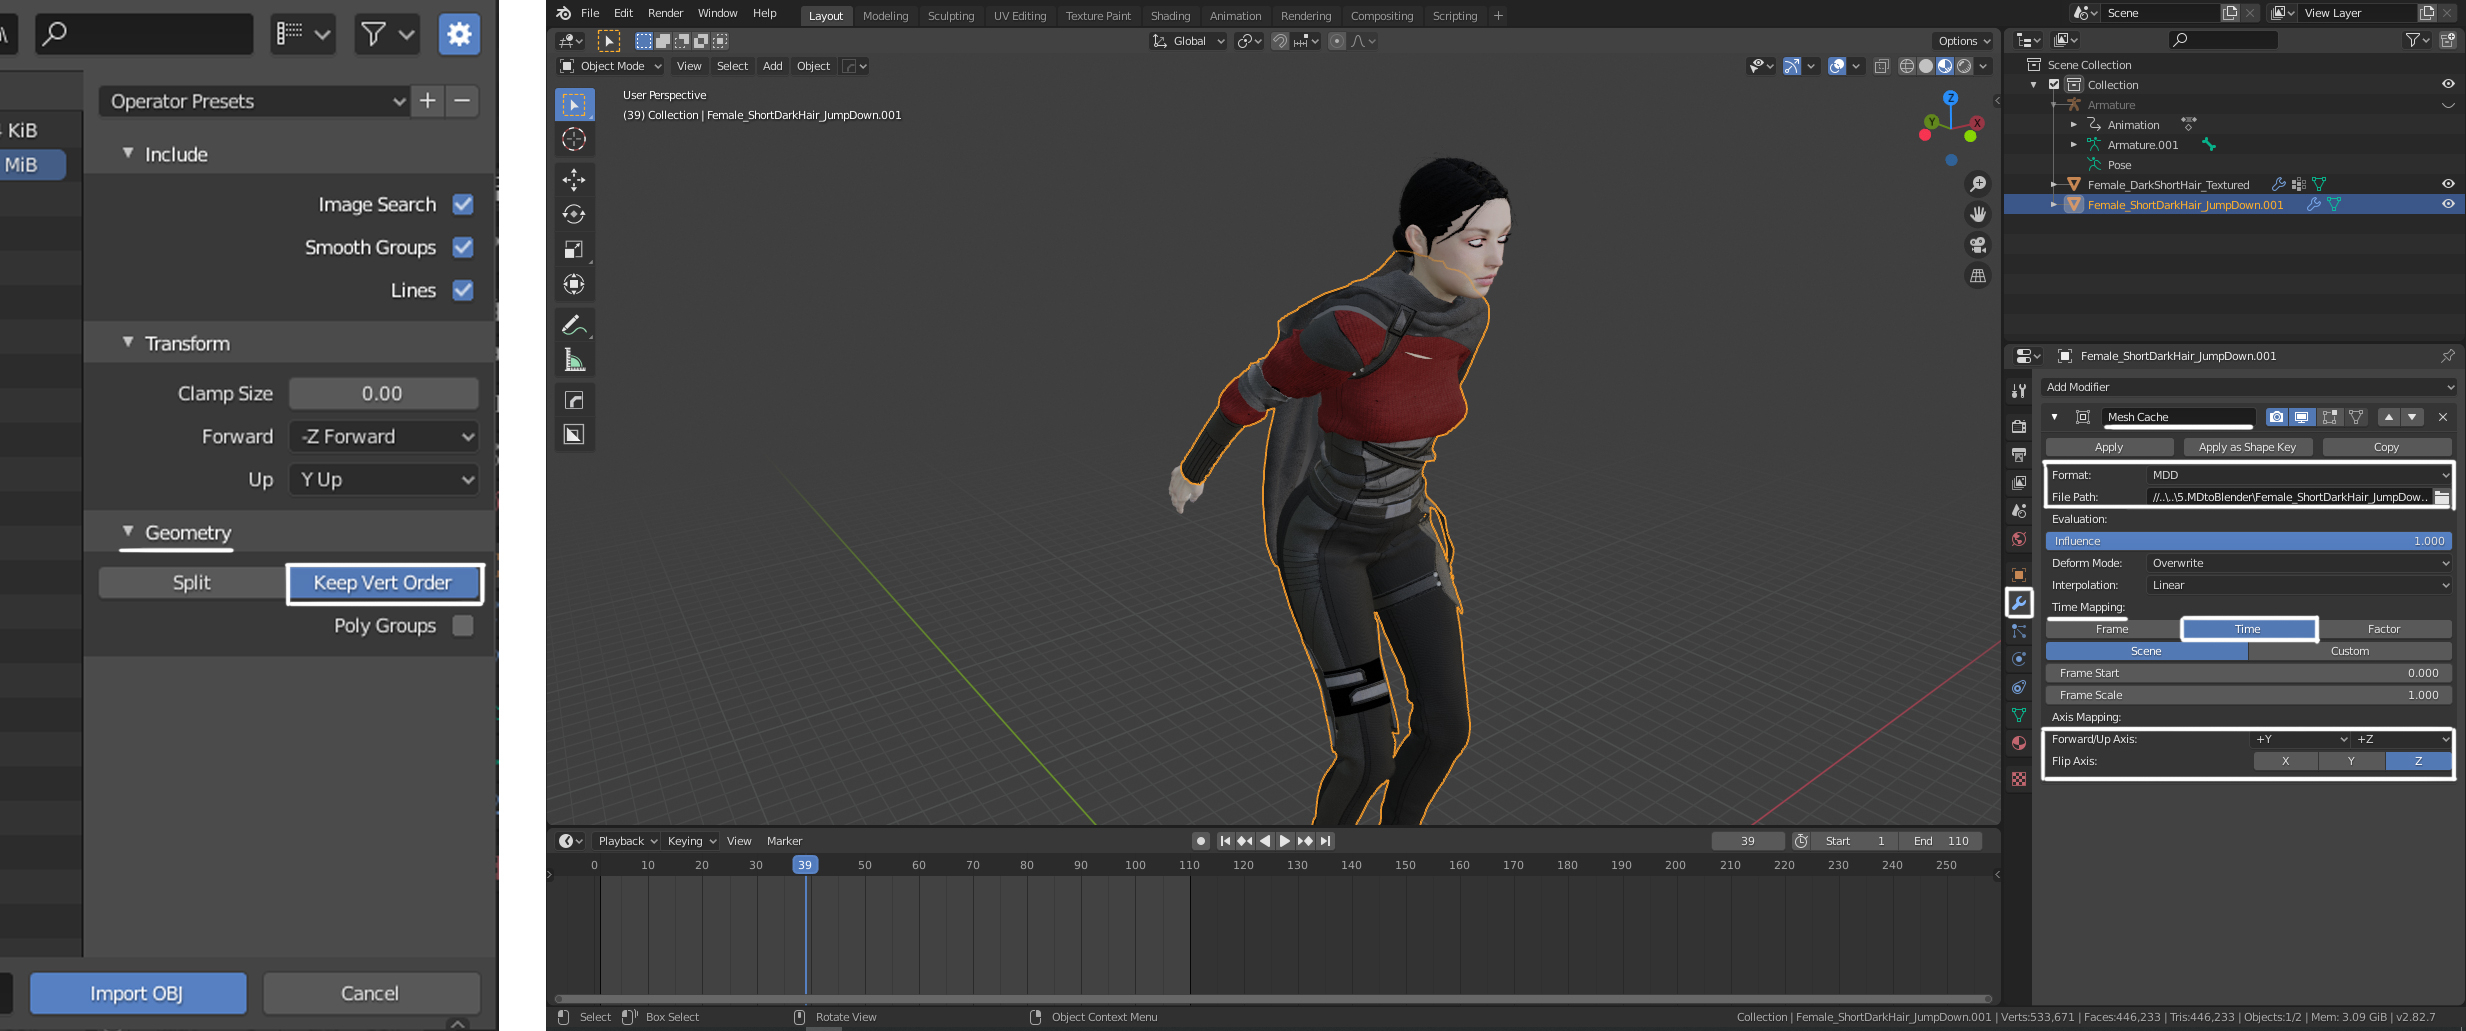
In this chapter you bring the animated figure and garment together
Exporting the animated garments will provide you with a .zip and .mmd file. The .mmd file has all the animated vertex data in it and you can use it to animate the .obj mesh that you can find in the .zip file.
Import the .obj in Blender. Make sure to select Keep Vert Order under Geometry when importing. If the order of the vertices changes, the .mmd file will not work.
Once imported, you need to link the .mmd file. Use a modifier called Mesh Cache. Browse to the .mmd file. The mesh will flip and mirror, so change the Forward/Up Axis and Flip Axis settings.
Make sure the Time Mapping is set on Time! If the character is going through the clothes, you’ll have to adjust the frame rate of the project. Remember that I said to remember the framerate you used in Marvelous Designer? In Blender, you can change the frame rate in the Output properties under Dimensions.
After this, everything should be set and you have an animated character with clothes!
Please let me know if this workflow works for you or if you have any suggestions to it! Feel free to share your questions and progress too!
Nice comprehensive workflow. But what if i have created b my character in mblab and want miximo animations. Do i need to rerig in mixiamo?
Hello Ameer,
I don’t have expercience working with MB-Lab so I don’t really now. I think you upload your previous rigged character but I think it is ‘safer’ to let Mixamo do its auto-rigger.
I followed along the steps, everything was going well, but when the alembic file(avatar) is imported in Marvelous designer, then its not upright and is colored black. When I manually adjusted it rightly to the axis, then after simulation it again goes to its initial position.
Hi! Can you check your export settings? See if the textures and uv maps are included in the export?
It is best to change and set the rotation correctly in Blender itself. In Blender, you can press ALT+R to clear the rotation and CTRL+A to apply the rotation.
hey there… pls what do i do now… after exporting the cloth animation in alembic format (made sure that framerates matched the animation of character in blender, tried simulating MD animation both in framestepping and real time). but can’t get the cloth and character to sync in blender…..
blender character moves faster than cloth.
Hello David,
Did you check the frame rating of your project? In Blender, you can change the frame rate in the Output properties under Dimensions.
Wooow this is my answer to my questions I was waiting since a week! Thank you! Do you have a YouTube channel? I’d like to try it today but I am a little bit confused on the step 6 (which is the most important!!!)
Do you have this tutorial on video?
My best,
Sandrine
Hello Sandrine,
Glad I was able to help someone out. I know what it feels like searching for weeks on a solution.
I have a YouTube channel here: https://www.youtube.com/channel/UC4o3yjipVI3N2WcaS-OCQxg although I don’t have a specific video on this item.
If you post your confusion, maybe I can try to clarify things.
All the best,
Hello, I tried using this method but I keep getting the vertex mismatch count. I am using blender 2.83. What do you reckon the problem could be?
Hello Vicki,
Are you sure both models have the same amount of vertices when copying the data? That would be my first thought. Also, try re-importing the mesh, maybe something went wrong there.
Other than that, I’m not sure. It has been a while since I worked on this project.
Hi, your posting was very helpful. I followed through and got the final result as I wanted. After that I was going to import this into Unity to use simulated clothes and the character, but in Unity three different things(original obj, newly created bone fbx, clothes mdd), so I couldn’t use it. I was wondering if you have any thoughts about this.
Thank you
Hello Minji Kim,
I’m sorry but I have no experience working with Unity. I won’t be able to help you further.
Regards,